People often ask me what my favorite exercises are to decrease low back pain. While no one exercise is perfect for everyone, I want to spend some time talking about the bridge. In this article, you’ll learn how bridge works and several variations to try.
There are several reasons why I (and many other physical therapists) love the this exercise:
A bridge is performed in a neutral spine position.
Often core stabilization exercises are performed in either a flexed position (think sit up) or an extended position (think up-dog). Depending on the type of injury, a patient may have, flexing the spine or extending the spine can increase pain. With the bridge, the spine remains neutral and hips are doing the work.
2. It works the posterior chain-essentially the back of the body.
In my experience, most people forget to strengthen these muscles. It doesn’t matter if they are the most avid of athletes to the weekend warriors forget. This is problematic because as these muscles get weaker, imbalances happen and can cause more back and shoulder pain.
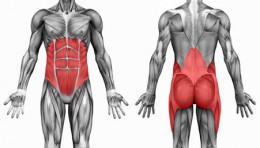
AS mentioned earlier, the hips are responsible for most of the action in any bridge exercisee. Primariliy, it engages the glute max, transverse abdominals, and hamstring muscles, as shown in the picture below. These muscles are essential in creating a corset of stability in the mid section to protect the spine from excessive movement and damage during lifting and bending activities.
3. It is an excellent exercise to do anywhere because no equipment is required.
4. It is an easy exercise to progress. Below you will find some of the variations to make this exercise more challenging.
What variations of the bridge are there?
Before we delve into this, it is important to mention that there are varying levels of difficulty with this exercise. We’ll explore the easiest variations first before moving on to more advanced ones.
The Basic Bridge
Lie on a flat surface with your knees bent and your feet shoulder width apart and your feet flat on the ground. Bring your belly button down to your spine by engaging your transverse abdominal muscles. These muscles are the same as the ones you engage when putting on a tight pair of pants or bracing yourself if someone were to punch you in the stomach. You should not be holding your breath or lifting your rib cage when tightening your transverse abdominals.
Once you have engaged your transverse abdominals, take a deep breath in. On the exhale, lift your hips up and squeeze your butt cheeks together. On the inhale, lower yourself back down. Repeat this motion for 8-10 reps and 2-3 sets, depending on your fitness level.
Have you mastered the basic bridge? Great! Now, you’re ready to move on to a single leg bridge or a bridge on an unstable surface such as a stability ball or bosu. Let’s explore these variations:
Bent Knee Ball Bridge
By bending your knees, you can isolate your glute muscles and minimize how much you use your hamstrings. The ball helps to add an element of instability, which forces you to engage your core to stabilize it. Since this variation is more challenging, start with 4-5 reps and only one set. As you get stronger, you can go up to 8-10 reps per set and do 3 sets. And, if you want an even bigger challenge, try holding for 5 seconds after your glutes are off the floor.

Bent Knee Straight Leg Chair Bridge
Another variation you can try is the bent knee/straight knee chair bridge. To perform this, you’ll need to elevate your legs onto a chair and perform bridge as usual. Doing so will increase the arc of motion your hips need to move through. Again, you should start slow with one set of 4-5 reps; the stronger you become, you can start to increase how many reps and sets you do. Remember, the recommended maximum is 8-10 reps for 3 sets. To test your strength even more, hold the position for 5-10 seconds after lifting the glutes.


Bosu Bridge
The Bosu is another way to add an element of instability to the bridge. Engaging your core muscles with this modification is important because the bosu will not stay in one position. The more engaged your core is, the less risk there is for injury. Try ii out by performing one set of 8 to 10 reps to see how it feels. If it is fine, add more reps and sets at a pace that’s comfortable for you; again, remember that the maximum of 10 reps for 3 sets.
Single Leg Bridge
The next type is the single leg bridge. To do this exercise, you get into the same position as you would for basic bridge. Once there, straighten one leg and raise your hips as normal. Doing this exercise on a regular basis increases the load you put on your glutes. It also strengthens your iliotibial band as you engage your core muscles to maintain level hips, thus preventing possible knee and back pain.

Reverse Bridge
Finally, we have the reverse bridge, which engages your upper body and gives you a slight shoulder stretch. Another benefit of this variation is the way it activates your triceps and upper back at the same time as your hips! To perform this variation, lay on your back like you would for a basic bridge. Next, place your arms behind your back with your fingertips pointing towards your heels. Then lift your glutes as normal for basic bridge.
Give these exercises a try and as always, consult with your physician before beginning any exercise program. If you have any pain with these exercises, make sure you are fully engaging your abdominals. If pain persists, contact your physical therapist or physician.